


Create a color picker
How to create a color picker
In this article, I'm going to show you how to put a color picker on a page and configure it to change the color of an element on that page. Our end result will look like this:
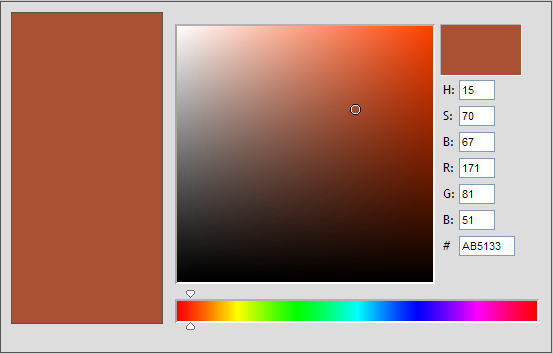
Here, we have an empty div at the left side and a div with a color picker on the right side.
The code we start with is this:
<!DOCTYPE HTML PUBLIC "-//W3C//DTD HTML 4.01//EN" "http://www.w3.org/TR/html4/strict.dtd">
<HTML>
<HEAD>
<title>Color picker</title>
<script type="text/javascript" src="customJs/dhtmlSuite-config.js"></script>
<script type="text/javascript" src="js/separateFiles/dhtmlSuite-common.js"></script>
<script type="text/javascript">
DHTMLSuite.include("colorWidget");
</script>
<style type="text/css">
body{
background-color:#CCC;
font-family:Trebuchet MS
}
#mainContainer{
width:530px;
height:330px;
margin:0 auto;
padding:10px;
border:1px solid #555;
}
#boxToColor{
float:left;
width:150px;
height:310px;
background-color:#FF0000;
border:1px solid #555;
}
#colorPicker{
float:left;
width:380px;
height:300px;
}
</style>
</head>
<body>
<div id="mainContainer">
<div id="boxToColor"></div>
<div id="colorPicker"></div>
</div>
</body>
</html>
For those of you who aren't familiar with the DHTMLSuite.include mechanism, please read this article.
In this code, we have included dhtmlSuite-common.js which we always should do. Then, we include the Javascript files needed for the color widget dynamically by calling DHTMLSuite.include("colorWidget"). We also have some CSS for our boxes and finally, the simple HTML for a parent div and two sub divs.
Open the page in your browser and see how it looks.
Now, we are ready to create our colorWidget object and put it inside the empty <DIV id="colorPicker"> element. We do that in a <SCRIPT> section below the HTML for our divs.
<script type="text/javascript">
var colorWidget = new DHTMLSuite.colorWidget({ callbackOnChangeRgb : 'setColor',hueSliderPosition:'horizontal',parentRef:'colorPicker' });
colorWidget.init();
</script>
The first line creates a new colorWidget object. We send some parameters to the constructor in an associative array. These attributes can be specified in this array:
- hueSliderPosition - Where to put the hue slider, possible values: "vertical" or "horizontal".
- callbackOnChangeRgb - Name of function to execute when the widget changes color. Notice that you should only send in the name of this function. This function will when it's called get an associative array
as only argument. This array will have the keys:
- rgb - Rgb code, example: #FF0000.
- red - value between 0 and 255.
- green - value between 0 and 255.
- blue - value between 0 and 255.
- hue - value between 0 and 359.
- saturation - value between 0 and 100.
- brightness - value between 0 and 100.
- displayHsv - Display form fields for hue, saturation and brightness, default = true.
- displayRgb - Display form fields for red, green and blue, default = true.
- displayRgbCode - Display form field for the rgb code, default = true.
- updateFormDuringMoveOnPalette - Update the form values while moving on the palette, default = true. When this option is set to false, form fields will be updated when the mouse button is released.
- parentRef - Where to insert the color picker div. This attribute is optional. Value could be the id, name or direct reference to a DOM element on your page. Also notice that this option is new and you might have to download a new zip file in order to use this attribute.
In the code above, we have specified that we want to execute a function named setColor when the color widget changes color. We have also specified that we want a horizontal hue bar and that the color picker should be placed inside the empty <div id="colorPicker">
The next thing we need to do now is to create the function which is defined in the callback attribute. What this function should do is to update the background color of <div id="boxToColor">.
This is how we do that:
var boxToColor = document.getElementById('boxToColor');
function setColor(color)
{
boxToColor.style.backgroundColor = color.rgb;
}
I have created a reference to "boxToColor" outside of the function so that we don't have to look it up every time when the function is called.
As mentioned above, the setColor function will receive an associative array of color properties. We use the "rgb" attribute which is the current color of the color widget to update the background color of "boxToColor".
The final code for our html page should now look like this:
<!DOCTYPE HTML PUBLIC "-//W3C//DTD HTML 4.01//EN" "http://www.w3.org/TR/html4/strict.dtd">
<HTML>
<HEAD>
<title>Color picker</title>
<script type="text/javascript" src="customJs/dhtmlSuite-config.js"></script>
<script type="text/javascript" src="js/separateFiles/dhtmlSuite-common.js"></script>
<script type="text/javascript">
DHTMLSuite.include("colorWidget");
</script>
<style type="text/css">
body{
background-color:#CCC;
font-family:Trebuchet MS
}
#mainContainer{
width:530px;
height:330px;
margin:0 auto;
padding:10px;
background-color:#DDD;
border:1px solid #555;
}
#boxToColor{
float:left;
width:150px;
height:310px;
border:1px solid #555;
}
#colorPicker{
float:left;
width:380px;
height:300px;
}
</style>
</head>
<body>
<div id="mainContainer">
<div id="boxToColor"></div>
<div id="colorPicker"></div>
</div>
<script type="text/javascript">
var boxToColor = document.getElementById('boxToColor');
function setColor(color)
{
boxToColor.style.backgroundColor = color.rgb;
}
var colorWidget = new DHTMLSuite.colorWidget({ callbackOnChangeRgb : 'setColor',hueSliderPosition:'horizontal',parentRef:'colorPicker' });
colorWidget.init();
</script>
</body>
</html>